|
|
|
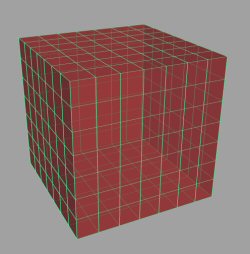
Undeformed jello cube |
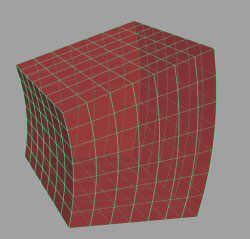
Deformed jello cube |
For this assignment you will program a physically-based simulation of a jello cube. The jello cube is made of elastic material, much like the jello sold in grocery stores. When the jello cube is stretched, it will try to contract. When squeezed together, it will tend to inflate back to the original shape. In order to simulate the jello, you will use a 3D mass-spring network, which is a very common tool in physically based modeling, especially with interactive systems.
Note: Please don't get discouraged by the length of this document. Starter code for this assignment already provides a lot of the code, including all of the OpenGL rendering code and numerical integration code. Once you have read this webpage carefully and understood the starter code, you will see that this assignment is not very difficult - but it does take its time, so please start early.
|
|
|
|
Undeformed jello cube |
Deformed jello cube |
You will model a cube of jello, which, when undeformed, has the shape of a cube of dimensions 1 meter x 1 meter x 1 meter. The cube will be constrained to stay in the interior of a bounding box of dimensions 4 meters x 4 meters x 4 meters. The center of the bounding box is located at the origin of the world-coordinate system. The axes of the bounding box are aligned with the world-coordinate system axes. The cube will stretch, contract, oscillate, change velocity, bounce off the walls of the bounding box, based on the physical laws for a mass-spring system. The cube will initially be positioned inside the box. When the cube reaches one of the walls of the bounding box, it should bounce off that wall back towards the interior of the bounding box.
A real-world jello cube is a continuous object, and if we were to simulate every small infinitesimal part of the elastic material, infinite memory would be required. For this reason, we will discretize the jello cube. This approach (discretization) is very common in phyisically-based modeling, and also applied mathematics and engineering in general. The cube will be modeled by 8 * 8 * 8 = 512 discrete mass points, all of equal mass. In the undeformed configuration, the mass points will form a uniform grid covering the volume of the cube. They will be positioned at (i / 7, j / 7, k / 7), where i, j, k are in { 0, 1, 2, 3, 4, 5, 6, 7 }. The rest length of all the springs will be determined based on the positions of the mass points in the undeformed configuration. As the cube deforms, the points will change position, giving us the shape of the cube at any given moment of time. Note that as the cube deforms, the points will no longer be the same distance apart from their neighbors. At places where the jello cube is squeezed, the points will be closer together, and where it is stretched, they will be farther apart than in the undeformed position.
The points with i=0 or i=7 or j=0 or j=7 or k=0 or k=7 are the points on the boundary of the cube. We will call these point surface points, since they define the surface of the jello cube. There are a total of 296 surface points. The surface of the cube can be rendered by drawing triangles connecting the surface points. The complete OpenGL code to do the cube rendering is provided in showCube.cpp. Interior points are not necessary for rendering, as they are invisible. They are, however, necessary for simulating physics.
You will model the movement of the cube by numerically solving a system of ordinary differential equations, which sounds perhaps a bit scary, but is actually not that difficult. The equations to be solved incorporate Newton's second law (F=ma), Hook's linear model of elasticity (F=kx), and linear damping (F=-kv). To solve the differential equations, you will use two methods: Euler integration, and Runge-Kutta 4th order (RK4) integration. The starter code already provides code which implements both the Euler method and the RK4 method - look for it in physics.cpp. All you have to do is appropriately call either of these two methods during the simulation. For a particular simulation, you will typically just use one of the two methods - but you have to make sure that both methods work correctly with your code.
You will have to implement the acceleration function (computeAcceleration, see physics.cpp). This function takes as input the positions of the 512 nodes, the velocities of the 512 nodes, plus the physical parameters of the model. It returns the acceleration for each of the 512 points. It also adds any effects of an external force field, if such a field is present of course. In general, the acceleration will of course be different for each of the 512 simulation points. To compute the acceleration, the function must take into account the forces due to
Initially, the cube will be in some prescribed **deformed** position, with some prescribed initial velocities. Your program will read the information about the initial position of the cube, initial velocity, and various other simulation parameters from a file on disk. The movement of the jello cube will depend on the information given in this file. We shall call these files 'world' files, because they describe the initial world (state) of the jello cube. The default extension for these files is .w (example: jello1.w) . Several world files are provided with the assignment, so that you can test your code. Included in the starter code is the routine loadWorld which loads all the information from a world file into processor memory. There is also a routine writeWorld which works in the opposite direction: it saves the current point positions, velocities, and other parameters to a valid world file on disk. See the comments in the input.cpp file for parameters to these two routines. Also, the starter code provides a separate application called createWorld. It can be found in the starting package (createWorld.cpp) . This application allows you to create your own world files without having to manually edit world files. For more info about createWorld and for a description of the structure of a world file, click here.
The cube will deform as a result of different velocities at different locations inside the cube. The velocity differences will happen for three reasons:
You have to implement collision detection and response for the jello cube hitting any of the six walls of the bounding box.
The world file might also specify an external non-homogeneous time-independent (i.e. possibly varying with location, but not with time) force field. If the force field is present, you must model its effect on the cube. The force field is given as an array of vectors, each specifying the 3D force vector (in Newtons) at a node of a 3D discrete grid. Note that this is a different grid than the jello cube grid; this force field grid covers the entire scene bounding box. Use interpolation to obtain values of the force field at an arbitrary position inside the bounding box. The grid is uniform, covers precisely the volume of the bounding box, and consists of n x n x n equally spaced points, where the parameter n is the resolution of the grid. It is specified in the world file. For this assignment, you need to support values of 2 <= n <= 30.
The provided slides (PDF | PDF, black and white, good for printing) contain information on:
To obtain a good view of the scene, the camera has to be positioned appropriately. The starter code already provides a complete code to do this (see jello.cpp). It allows the user to move the camera around in real-time, and observe the jello-cube from different angles. The description of the method to position the camera is here.
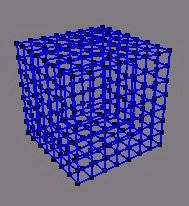
Your program will allow two rendering modes: wireframe and triangle. In the wireframe mode, only the surface points (no filled triangles) are shown, together with the structural springs connecting them. Structural springs are one of the three kinds of springs that are used with the mass-spring system. You can learn more about this from the provided slides (see the Helper slides section). In the triangle mode, surface of the cube is rendered as triangles (and the surface points are vertices of these triangles). Start-up code provides supports both for the wireframe and triangle rendering mode. It is possible for the user to switch among the two rendering methods at run-time, by pressing 'v' (see also showCube.cpp). Also, in wireframe mode, user can independently turn on/off the display of structural springs, shear springs and bend springs. Thus, any of the 8 on/off combinations can be selected. Pressing 's','h','b' toggles the display of structural, shear and bend springs, respectively. Note that to avoid screen clutter, only the springs connecting two surface points are shown, but the simulation of course has to simulate the structural, shear and bend springs appropriately connecting all the 512 simulation points.
In the triangle mode, the jello is illuminated using proper OpenGL lighting. Starter code provides a complete lighting environment in jello.cpp . You are free to change lighting parameters, or make other rendering improvements/modifications. This way, you can personalize your assignment - otherwise all the cubes for the entire class will look the same (except for any differences in implementation of physics of course), which would make for a quite boring final assignment movie.
Also, you might be awarded credit for any other creative or interesting solution to an issue in your implementation, as long as it is well-documented in your readme file. So, if you can think of any interesting feature, feel free to implement it.
Please note that the amount of extra credit awarded will not exceed 25% of this assignment's total value.
This assignment consists of two applications: jello and createWorld. Starter code provides a complete implementation for createWorld, which is a tool to design your own physical environments. createWorld is a single-file application, and independent from the rest of the assignment. Its implementation is createWorld.cpp .
You will be developing the application called 'jello'. The main files for this application are jello.h and jello.cpp, but several other files are used as well.
In the starter package, all of these files already contain code for pre-implemented functionality such as lighting, camera positions, integrators, etc. You can modify any of these files in any way you want and you can add your own files, if you need to. Also in the starter package, there are some examples of world files. You can download the complete starter package here.
Installing OpenGL and GLUT: Windows, Linux and Mac OS X come with OpenGL preinstalled. On Linux and Mac, GLUT will also already be installed. If you are using Mac OS X Mojave, make sure you have updated the OS to the latest version; otherwise, you may get erroneous behavior such as a black screen. For Windows, we provide GLUT with the starter code. You should be able to build the starter code in MS Visual Studio 2017 by opening hw1.sln and clicking "Build". There are two projects: "jello" and "createWorld"; "jello" is the main driver. Note: Because there are many versions of Windows 10 (different build versions), you may get an error:
2>C:\Program Files (x86)\Microsoft Visual Studio\2017\Community\Common7\IDE\VC\VCTargets\Microsoft.Cpp.WindowsSDK.targets(46,5): error MSB8036:
The Windows SDK version 10.0.XXXXX was not found.
Install the required version of Windows SDK or change the SDK version in the
project property pages or by right-clicking the solution and
selecting "Retarget solution".
This can be solved, as the message says, by right-clicking the solution and selecting "Retarget solution".
Here is one suggested workflow for solving the assignment. You can of course take alternative routes.
In addition to your code and the README file, you are required to submit an animation, represented by a series of JPEG images which are screenshots from your program. Do not exceed 300 frames. The frame rate for the animation should be 15 fps, which corresponds to 20 seconds of animation running time maximum. Please name your JPEG frames 000.jpg, 001.jpg, and so on.
In the animation, you should try to demonstrate your results in some interesting way. Show your OpenGL lighting skills, apply texture, and above all, show interesting deformations and dynamics. In order to create the animation, you can create your own world files, as you see fit.
How to create the animation: Starter code includes the functionality to output the current screen to a "Portable Pixel Format" (PPM) file. You can always take the screenshot of the current screen by pressing spacebar. In order to capture an animation, comment the "saveScreenToFile=0" line in the "doIdle" routine, and press spacebar to launch the continuous frame capture. You can then convert the PPM files to JPEG using any image manipulation program that supports batch file conversion. For example, you can use the freely available IrfanView program.
Please submit:
Please submit the assignment using the USC Blackboard. In order to do so, create a single zip file containing your entire submission. Submit this file to the blackboard using the "Attach File" field. After submission, please verify that your zip file has been successfully uploaded. You may submit as many times as you like. If you submit the assignment multiple times, we will grade your LAST submission only. Your submission time is the time of your LAST submission; if this time is after the deadline, late policy will apply to it.
Note: The instructor will read your code. Quality of your code and comments might affect your grade. This is an individual assignment. Your code might be compared to code of other students using a code comparison tool.
&).
It doesn't use object-oriented programming. Under Linux/Mac OS X, you have to compile the code with 'g++', not
with 'gcc'.gluPerspective(90.0,1.0,0.01,1000.0);A bad call would be:
gluPerspective(90.0,1.0,0.0001,100000.0);or even worse:
gluPerspective(90.0,1.0,0.0,100000.0);In the last two examples, the problem is that the ratio between the distance of the far clipping plane (=last parameter to gluPerspective), and the distance of the near clipping plane (=third parameter to gluPerspective) is way too large. Since the z-buffer has only finite precision (only a finite number of bits to store the z-value), it cannot represent such a large range. OpenGL will not warn you of this. Instead, you will get all sorts of strange artifacts on the screen and your scene will look nothing like what you intended it to be.